I asked my mom to come over one day last week so we could bake. And what a day we had!!! Eggplant burekas, biscochos and reshas! My husband and sons have been thrilled! Home-baked goodies are the best…..great ingredients, great recipes and lots of love! What more can you ask?
I started preparing the eggplant filling first thing. When my mom arrived, we made the dough for the reshas as it is a yeast dough and needs time to rise. Then we made the bureka dough, formed the burekas and got them in the oven, shaped the reshas and let them rise again, and started the biscocho dough. All the while, we talked, visited and had a wonderful day! My friend Yvonne stopped by and visited with us for awhile, my Dad joined us and helped to pack all the finished goods (he’s an expert at that!), and my husband, Bob and son, David, got home in time to provide the official taste tests! What a special day! And we have been enjoying the bounty ever since….

Filling for Eggplant Burekas
4 medium eggplants, diced
3 large onions, diced
2 heaping tablespoons of parev chicken seasoning
2 – 8 oz cans (yes, that’s 16 oz) of tomato sauce
1 level teaspoon sugar
1 tablespoon lemon juice
pinch of red pepper flakes
Sauté the eggplant and onions in a large pan using approximately one tablespoon of olive oil. When onions become soft and begin to become translucent, add parev chicken seasoning, tomato sauce, lemon juice and sugar. Finally, add a pinch of pepper flakes. This is optional, and does add a kick. (I used a full level teaspoon, and it added QUITE a kick!) Continue to cook on low for at least an hour.

For the dough, we’ll repeat the recipe from the previous post:
Kaye (Hasson) Israel’s Recipe for Bureka Dough
Ingredients:
3 C Ice Water
2 1/2 C Oil
1 tsp salt
10 – 12 C Flour
Fill measuring cup with ice cubes, add water to 3 C mark on measuring cup. In large mixing bowl, add mix of water and ice, oil and salt. Let stand for as few minutes for water to get ice cold before beginning to add flour. Continue to mix. As flour begins to take on elastic consistency of dough, remove ice cubes. Knead until dough is not sticky and has the consistency of a pie dough.

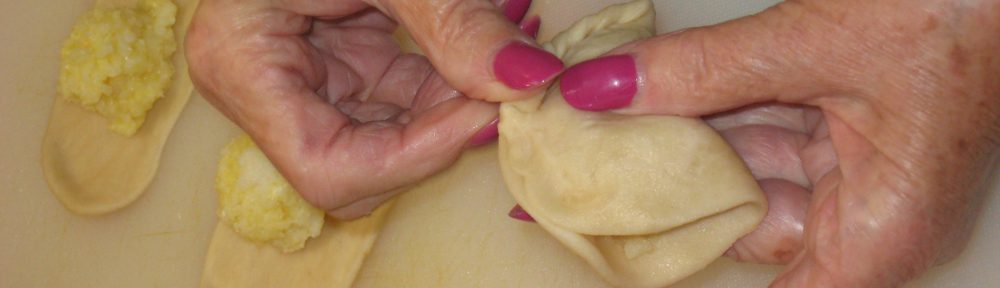
Separate dough into 4 portions. Pinch off “walnut” sized balls and place on a work surface. Work each ball in the palm of your left hand (if you are right handed). Use your right hand to tuck the dough under and into itself, working to make it a smooth ball. As balls are formed, place them on a parchment lined baking sheet. Once all the balls are prepared and the dough has had a chance to “rest,” begin by placing 6 balls on work surface. Using your fingers, press out the dough; then, with a small rolling pin, make oval shaped, flat forms. Using a tablespoon or small scoop, scoop filling into the middle of the flatten dough.

After all 6 have been filled, fold each on in the middle, pinching the edges shut and making a moon shaped, filled pastry. You can make a beautiful edge by pinching and rolling under the edges (see video clip). Or you can use a fork to crimp the edges with a nice, clean pattern. (Remember, you “taste” first with your eyes.).
Enjoy!!!

***** ***** ***** ***** ***** ***** ***** ***** *****
We also made reshas or reshikas as they are sometimes called. They are a wonderful, light, crunchy tea biscuit that are a favorite in our family. A resha is not actually sweet or savory; it is light and has a crunch that is sensational, especially if you love texture in your food! I think of reshas with a cup of coffee or tea and with a chunk of sharp cheese. My husband and my sons love them with dips such as tarama (a Sephardic caviar spread), with tzatziki (a Greek yogurt dip), and with ajada (a potato and garlic dip). Mostly, they love knowing they are in the kitchen, and grab one when passing through!!!! Reshas take time to make.
Start by making a yeast dough.
Kaye’s Resha Recipe
2 packets of Yeast Powder or 4 heaping tblsp of dry yeast
1 1/2 C + 1 tsp sugar
1 C lukewarm water
1 C oil
6 – 8 C flour
Start with 2 packets of fresh yeast ( always check expiration date on package). Place in a glass bowl. (*rinse bowl in warm water first). Add 1 C of lukewarm water. Add 1 cup of sugar. Set aside in a warm place ( a toaster oven or microwave….not turned on). Allow yeast to proof ( foam), about 20 minutes.

Meanwhile, sift flour into a mixing bowl. (How much flour? you ask.) Start with 1 – 2 C to get mixing started. Add 1 ½ C of lukewarm water, oil, and 1 1/2 C of sugar. You’ll note that we have said “lukewarm” water several times. This means…..not cold from the tap, and not hot. Hot water will kill the yeast, and not only will your dough not rise, it will become heavy and brick like. Trust me….I’ve figured in the past that if warm is good, hot is better. Was I wrong! I ended up with a batch of doorstops, paperweights and hockey pucks!!!! SO…warm means….just that, warm!!!! (Now, go forth and figure out for yourself what that means!!!)
My mom use an electric Mix Master with a dough hook.

As you start mixing, add the foaming yeast mixture. Then, add additional sifted flour, approximately 1/2 cup at a time…..ultimately about 7 Cups. (Add it slowly….it will “suddenly” start to come away from the sides of the bowl and become “dough”). When it begins to come away from the sides, turn the dough onto a floured wood surface or table, adding approximately 1/2 cup additional flour. Work the dough; knead it. You want the dough not to be sticky as long as you can handle it without it sticking to your hands. To achieve this feel with the least amount of flour produces the best results. (You’ll get the feel of it, honest!)

Put it in a bowl, cover with a piece of Pam-sprayed plastic wrap. Tuck the plastic edges in nice and cozy! Put the dough in a “warm” (i.e. draft-free) place and let it rise for about an hour. My mom will tell you this is a good time to go make the beds, or straighten up the house. My cousin Sarita will tell us it’s a good time to run up to Neiman’s and see what’s new. I’ll tell you it’s a great opportunity to start preparing some biscocho dough and make a day of baking!!!! You choose!


After it rises for an hour, punch it down…

Cut the dough into walnut sized pieces.

Roll each piece into a long rope, perhaps 12″ long:
Turn into a pretzel-like shape. “Paint” with an egg-wash and dip into sesame seed. Place onto parchment lined cookie sheet.

Now, let them rest for another hour under cover as they rise again. Place in a preheated 350 degree oven. Here’s the important part: place baking sheet on low oven rack for about 10 minutes or until bottom of reshas begin to turn a golden color. Then place them on the upper rack of the oven. It should take about another 10 – 15 minutes until the tops become a golden brown as well. (This depends on the oven and might take a try or two to figure out the exact timing).
Remove from oven and allow to cool. Return them to a 200 degree for 1 hour to “biscochar” ( crisp ’em up). Enjoy!!!
Biscochos de Huevo
Biscochos are often called tea biscuits. We think of them as a “biscotti”, a crunchy treat! Biscochos are a bit sweet and are wonderful with your morning coffee (could be afternoon or evening coffee or tea or even milk, for that matter!!)
Ingredients for My Mom’s Biscochos
1 C eggs
1 C sugar
3/4 C oil
3 tsp baking powder
1 tsp vanilla flavoring
5 – 7 C flour
Topping:
1 egg + 1 drop of water, beaten well
sesame seeds
(alternative to sesame seeds: cinnamon and sugar or “sprinkles”)
These are my mom’s directions:
With electric mixer, beat eggs and oil in a mixing bowl. Add sugar and vanilla and continue to beat until well blended. Add flour and baking powder gradually, knead into a medium dough until no longer sticky.

Place onto floured work area and finish kneading dough with additional flour as needed. Dough should not be sticky as long as you can handle it without it sticking to your hands.

Take walnut-sized pieces and roll down on table with palms of hands into a rope 5 inches long and only 1/2 inch thick.

Press down with fingers to create channel;

Fold rope over and cut slits into the edge.

Join into a bracelet shape. Brush egg on top side.
Dip top side into chosen topping ( sesame, cinnamon sugar or sprinkles):

Place on cookie sheet lined with parchment paper. Bake in preheated 350 degree oven for 12 minutes or until lightly brown. Remove from pan. Allow to cool.

We look forward to your comments!
Have a cup of coffee and enjoy!
Bendichas Manos!!!!!
